
Background#
Several years ago, I bought a Synology DS920+ to use as a network attached storage (NAS) appliance in the house. I don’t work as a photographer or video editor so my work doesn’t really have any massive storage needs; rather, I wanted someplace to host media for the family that didn’t require an ongoing subscription service to access. For a few years, it served that purpose almost exclusively, both as a drive I could mount and as a Plex server.
Recently, I had begun tinkering with a few other services and seeing how far I could push my Synology. It has a Container Manager service that allows you to run Docker containers, although the interface is very GUI-driven and there’s always a few gotchas. For example, Synology reserves port 80 and 443 for their own web station and reverse proxy services, which makes it difficult to run your own reverse proxy on the device.
For these reasons, I started to consider buying a separate device to act as a home server and repository for all my containers that I would have full control over, and relegate the Synology back to its role as just dumb storage.
Choosing a Mini PC#
I had used Raspberry Pi’s here and there over the years for little hobbyist projects, but the prices on newer models have increased to the point where they are getting pretty close to proper PCs. I ended up going with a Beelink Mini S12 Pro, which packs an Intel Alder Lake N100 with 16 GB of memory and a 500GB NVMe SSD. I wanted the Intel CPU to support hardware transcoding for Plex, and the idle power draw for the entire device is really low (somewhere between 6 to 10 Watts).
Having read some reviews and impressions from previous owners of the S12 Pro, it seems like the quality of the SSD that it comes with is questionable. I was probably going to want to upgrade the storage anyway, so I also ordered a Kingston 1TB NVMe SSD to replace it with. The S12 Pro also has an additional connector for a 2.5" SATA drive, so I grabbed a Crucial 1TB SATA SSD as well.
When all the pieces arrived, I opened up the mini PC, swapped out the NVMe drive with a single screw, connected and screwed in the SATA drive, then put the cover back together and powered it on.
Proxmox#
Before buying the Beelink, I had put some thought into what I wanted the host OS to be. At one point, I was considering just throwing Ubuntu on there and running something like Coolify to deploy some things. In the end, I settled on Proxmox for a few reasons:
- I really like the virtualization approach and the flexibility of using both virtual machines and Linux containers (LXCs) on the same platform.
- There is a great community behind Proxmox that has already developed helper scripts for a variety of services. This would save me from having to reinvent the wheel for some commonly used services.
- I could easily expand this single Proxmox machine into a cluster eventually for high availability, if things get that serious.
- Proxmox has great built-in support for snapshots and using them to roll back to previous states of machines and containers.
I downloaded the Proxmox 9.1 ISO, threw it onto a USB stick, booted the Beelink from it and installed it right onto the SSD, making sure to give it a static IP from my router during installation.

There are a couple of tweaks I had to make as a non-Enterprise user of Proxmox after install. These include disabling the enterprise repositories for package updates and adding ones that don’t require a subscription. I made these changes myself in the Proxmox UI under Updates > Repositories, but I could also have grabbed a Helper Script that has been written to do all of this in an automated fashion. I also had to go into Datacenter > Storage and set up my second SSD for it to be usable and visible in the Proxmox UI.
Tailscale#
I have used Tailscale for a little while now to give my computers, phone, and tablet connectivity to my NAS even when outside of the house. Synology has a Tailscale app in their package manager that made installation and setup a breeze, and I hadn’t needed to go any deeper than that up until this point. But since I’m moving everything over to the Proxmox node, I wanted to put Tailscale on there as well and start taking advantage of its more powerful features.
My requirements for setting this up were simple - I wanted to have a single Tailscale install grant me connectivity to any services I may be running on the server. But I also wanted to run Tailscale in an unprivileged LXC to avoid giving it more permissions than I have to. Tailscale has put out some great tutorial videos about getting started installing it on Proxmox, but their example has you installing Tailscale directly on the Proxmox host itself as root, which is something I didn’t want to do.
Installation#
Looking at the Helper Scripts repository, there is a script for Tailscale, but it is an “add-on” - something to run inside a previously created and established LXC, not one that will configure an LXC from scratch for you.
I started by creating a new LXC container in Proxmox based on their Ubuntu 24.04 standard template with 10 GB of storage and 512 MiB of memory. After booting up and logging in via the Proxmox console, I made things easier for myself by allowing me to SSH in as root by editing /etc/ssh/sshd_config and commenting out the following line:
PermitRootLogin prohibit-passwordAfter running sudo systemctl restart sshd, I could SSH with the root password from my computer’s terminal, which allowed me to have some quality of life stuff, like the ability to copy and paste from the terminal.
Next was updating and upgrading the stuff already in the container:
apt-get update && apt-get upgrade -yFollowed by adding curl, which will help install Tailscale but does not come in LXC containers by default:
apt-get install curlFinally I was ready to install Tailscale. The Tailscale website has a handy one liner that lets you curl their install script and execute it. In a production environment, this is not something you want to do, but with a home lab, it’s up to you to trust the vendor and inspect the script. I’ve used this before from Tailscale, so I went ahead and ran it:
curl -fsSL https://tailscale.com/install.sh | shFinally, I went back to /etc/ssh/sshd_config and uncommented the PermitRootLogin line to block logging in with just the root password again.
Configuration#
Now Tailscale is installed. I could start it up, but all it would do right now is allow me connectivity back into this container. I want Tailscale running inside this container to be my access point to the rest of my home lab, including the other containers that will be running on Proxmox. To do that, we have to do three things: enable ip forwarding, grant Tailscale access to the host’s network settings, and advertise the subnet that we want Tailscale to route traffic to.
IP Forwarding#
This is probably the most straightforward of the tasks. I just needed to edit /etc/sysctl.conf and make sure the following lines are presented and uncommented:
net.ipv4.ip_forward=1

net.ipv6.conf.all.forwarding=1
I saved the changes and that’s it for IP forwarding!
Host Networking#
Because I’m running Tailscale in an unprivileged container, it does not have access to all of the host’s hardware and settings. This is exactly what I want, but in this case I need to make an exception for network settings, as I want Tailscale to be able to route traffic outside its container. Tailscale has a great knowledge base article written up here about this.
The first step is to shut down the LXC container with Tailscale. Then, I opened a shell to the host Proxmox server and edited the file /etc/pve/lxc/[ID].conf, where [ID] is replaced with the ID of my Tailscale container.
Inside, at the very bottom, I added the following two lines:
lxc.cgroup2.devices.allow: c 10:200 rwm
lxc.mount.entry: /dev/net/tun dev/net/tun none bind,create=file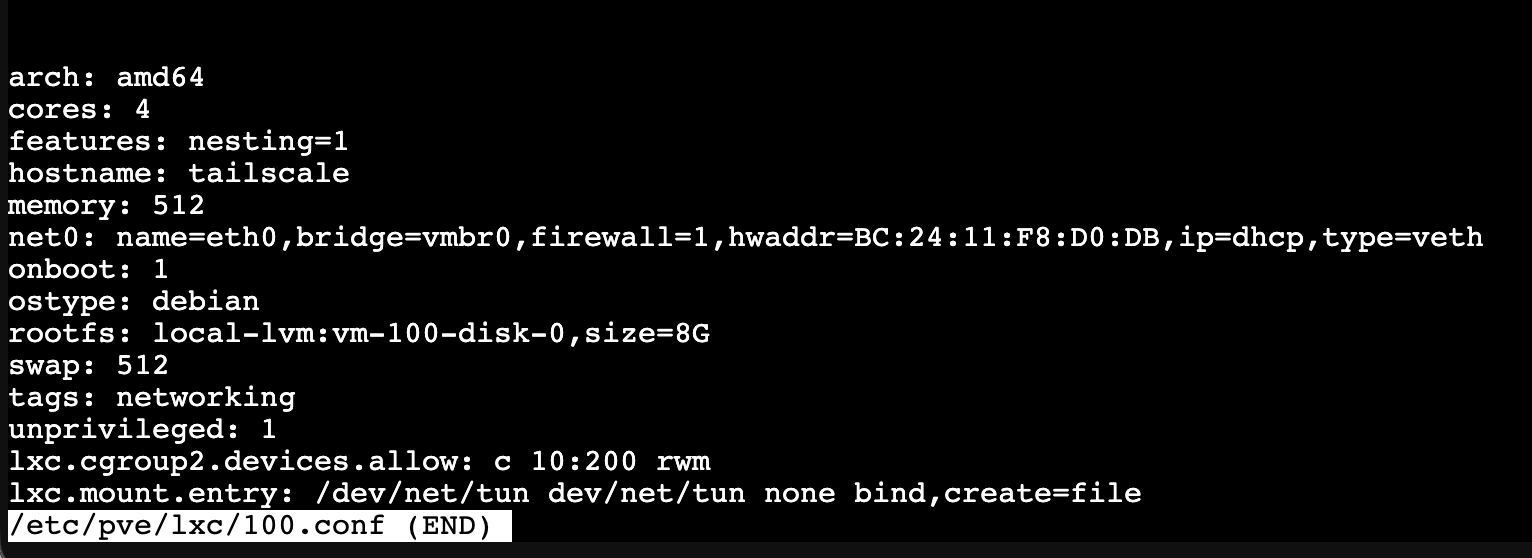
Those two lines will allow my Tailscale container to have access to Proxmox’s network settings. I started the container back up, and all that is left is the last step.
Advertise Subnet Routes#
Since I’d like to be able to reach the Proxmox web UI via Tailscale without installing Tailscale on the host itself, I need to configure Tailscale in a way that it extends my tailnet to Proxmox itself. Eventually, I will have other containers running here as well and I don’t want to have to install Tailscale on each and every one just to have remote access. Tailscale has a feature called subnet routers that is designed just for this purpose. All that is needed is to run the right command when bringing Tailscale up in my container where it is installed, and accepting the routes in the admin console.
The first step is to finally turn on Tailscale with my subnet advertised:
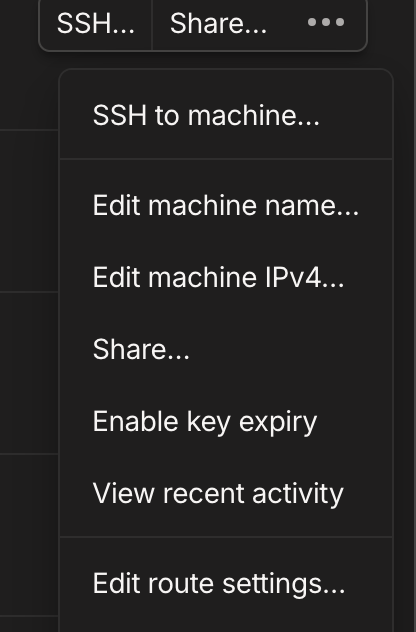
tailscale up --advertise-routes=192.168.50.0/24Because this is the first time I started Tailscale in this container, it generated a link that I needed to follow to authenticate the container to my Tailscale account. Once that is done, I was able to go into the admin console on the Tailscale web UI and click the Overflow (…) button on my container Tailscale node and select Edit Route Settings. Inside was the subnet I had just advertised and all I had to do was approve it.
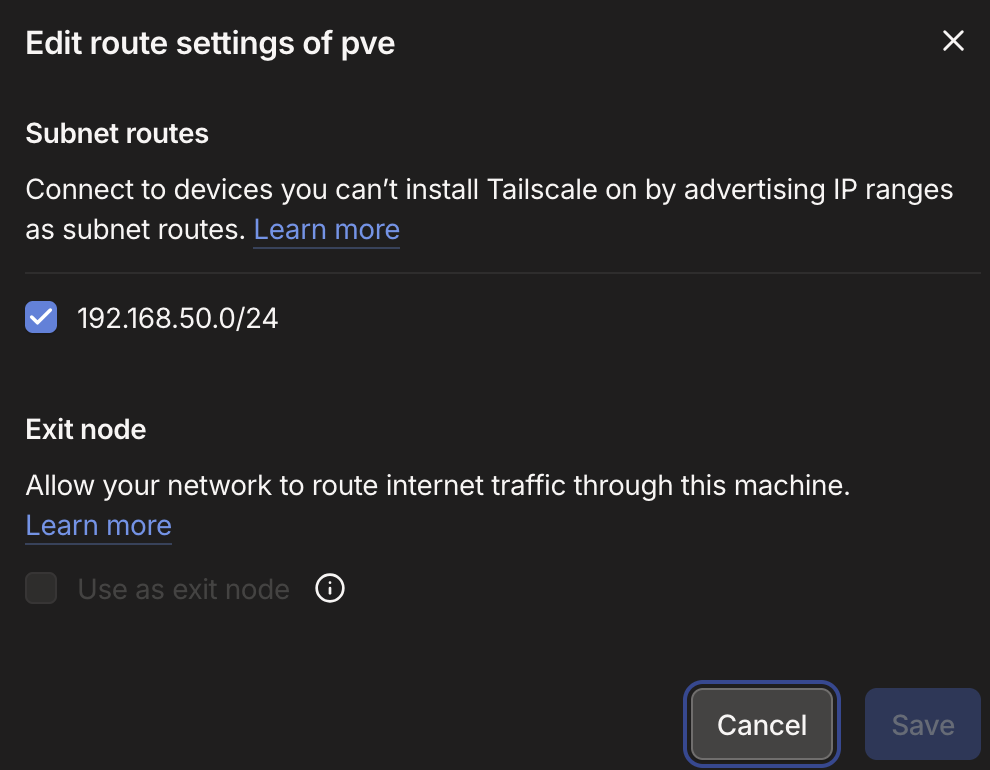
Now I was able to use Tailscale to reach my Proxmox console remotely. One last thing I did was go back to the admin console, click the Overflow button again and choose Disable Key Expiry. Normally, Tailscale will refresh its keys for a node every few days, which isn’t an issue on systems that you will use and interact with frequently (mobile devices and computers). Since this is a container I’d like to be the main remote entrypoint to my home lab without requiring much intervention, I don’t want that - so disabling the key expiry prevents it from silently breaking on me.
Wrap-Up#
And that’s it! I have Tailscale properly configured and ready to be my remote entrypoint into any lab service I plan on installing. This configuration is a good foundation to start building out more services, as I’ll write about in some future posts.